Mastering the Basics: How Do You Grade Land Properly for Success
Ever wondered, "How do you grade land properly?" Well, it's not just about moving dirt around! Land grading is an art, a science that plays a pivotal role in construction and landscaping. Picture this: you're building a dream house or creating a lush garden. The ground beneath, uneven and unpredictable, needs a bit of taming. That's where land grading steps in. It's not just about aesthetics; it's about creating a solid, stable foundation for your projects. So, let's dive in and unravel the essentials of land grading, an unsung hero in development and design.
Understanding Land Grading: A Primer

What is Land Grading?
Simply put, land grading is a cosmetic surgery for the earthly body. This process entails shaving away sections of land till they form the desired shape or slope. Why do we do it? Yes, it is imperative when constructing houses and keeping your garden waterlogging-free. Consider it as a way of preparing for the principal act–construction, farming, or gardening. If you fail to grade well, you are inviting problems of bad drainage and, worse cases, even damage to your house structure. Yes, it is a big thing!
Key Benefits of Proper Land Grading
Now, let's talk perks. Land grading is more than just another process in construction; it's revolutionary. Here's why:
- Improved Drainage: Bye-bye, water ponding at your foundation. Check if grading is done properly on each part where it should flow away.
- Solid Foundation: This type of land is known as well-graded land and provides a strong foundation for the construction of buildings. This is similar to making sure that you provide a strong pair of boots for your house.
- Erosion Control: Grading is one of those measures taken into consideration to combat soil erosion, especially in hilly terrain. Consider it as a shield that prevents soil from losing away.
- Enhanced Aesthetics: Finally, it appears cleaner too. Grading makes land neat and tidy to create a good atmosphere for landscaping or construction.
Each of these benefits plays a crucial role in ensuring the longevity and safety of your projects. It's not just about leveling ground; it's about laying the groundwork for success.
Land Grading vs Excavation: Clearing the Confusion

What is the Difference Between Land Grading and Excavation?
So, what's the scoop? Often, people get muddled when it comes to understanding 'What is the Difference Between Land Grading and Excavation.' Here's the lowdown: Excavation is like the heavy lifter. It involves digging up and removing soil or rock from a site – think of it as creating a blank canvas for a project. The land grading process, on the other hand, is the fine artist. It's about smoothing and shaping the existing surface. For example, excavation comes into play when creating a new basement, while grading ensures your lawn slopes away from your house for proper drainage. Two different roles are both vital for the perfect project execution.
Is Grading the Same as Excavation? A Comparative Analysis
Now, let's dissect this further: 'Is grading the same as excavation?' In a nutshell, nope. While excavation is about removal, grading is about refinement and precision. Imagine excavation as the process of carving out a swimming pool pit. Once that's done, grading takes the stage to shape and prepare the surrounding land for landscaping. There are moments when both these processes dance together in a project. For instance, when building a road, excavation makes way for the roadbed, and then grading steps in to ensure the surface is perfectly leveled for paving. It's like a tag team, where each process complements the other to create a harmonious outcome.
The Art of Land Grading: How Do You Grade Land Properly

Essential Steps in Land Grading
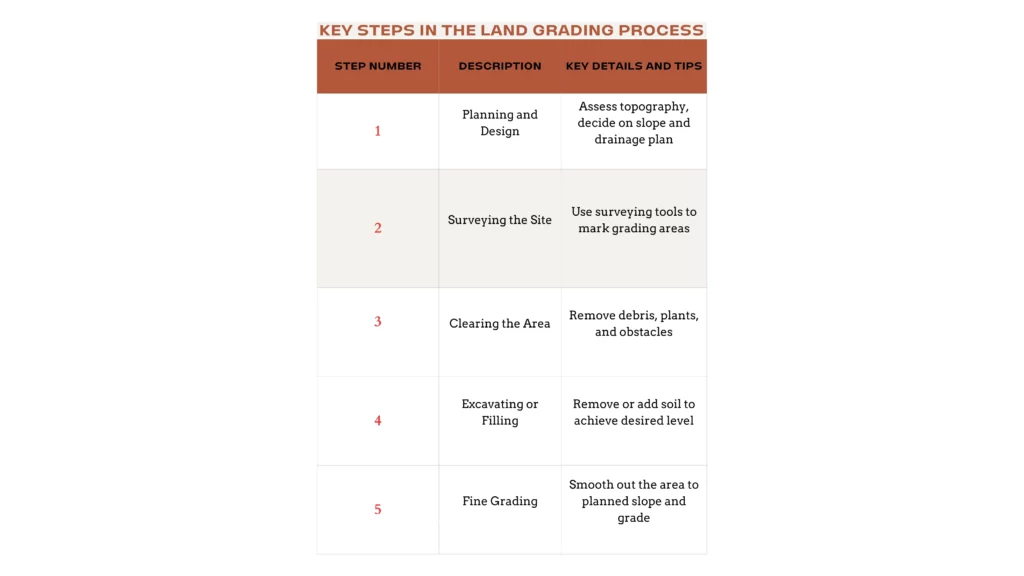
Getting down to details, "How do you grade land properly?". It's more than moving earth – it involves careful consideration of every tiny aspect.
Planning and Design: First, one should conduct an inspection of the surrounding area. Understand the relief, choose the slope direction, and install the appropriate drainage system.
Surveying the Site: Bring out the tools! Survey equipment should be used in the grading of those areas.
Clearing the Area: Make sure to remove any branch, rock or thing that would obstruct the view. It's as much like priming a blank canvas for painting, as much as it is.
Excavating or Filling: It all depends on the purpose of excavating or filling with soil to meet your target level.
Fine Grading: This involves precision. Planned slot and leveling grade for the smoothness of the area. So to speak, it's the icing on the cake.
Common Mistakes to Avoid in Land Grading
Now, let's talk pitfalls. The other key final consideration in planning is implementation, as without this, the most well-thought-out plan will also fall apart. Here are some common mistakes to steer clear of:
Ignoring Natural Drainage: Failure to consider what water will be passing via and around the drainage structure could bring some big problems like erosion or flooding.
Inaccurate Sloping: Many troubles can be encountered while getting the proper slope because water could accumulate or flow to structures; no doubt, it is not appropriate at all.
Over-Compaction of Soil: Compactness of soils also makes a negative contribution to the drainage system and impairs root development.
How Do You Know if Soil is Poorly Graded?
Ever wondered if your soil is throwing a tantrum? Poorly graded soil is like a mischievous kid – it gives you signs. Here's how to spot them:
- Water Pooling: After a rain, notice any puddles hanging around? That's a red flag. Water should drain away, not throw a pool party.
- Erosion Tells: Notice lines or gullies in your soil after a downpour? That's erosion chatting with you, saying the slope's not right.
- Uneven Plant Growth: Plants are like nature's tattle tales. Patchy growth can indicate poor grading and uneven water distribution.
For a quick soil check, try the 'soak and watch' test. Water an area and observe. If the water lingers like an awkward guest, you've got grading issues. Remember, the goal is harmony – water and soil in sync, not in a struggle.
Practical Tips and Techniques for Effective Land Grading
DIY Land Grading: Tools and Techniques
Ready to play in the dirt? DIY land grading is doable with the right tools and techniques. Start with the basics: a good, sturdy shovel, a landscaper's rake for smoothing, and a level or laser level for accuracy. Safety first, though! To protect yourself, put on gloves and strong boots. Now, for the best practices: always start from the high point and work your way down, checking the level as you go. Smooth out the soil in layers, not all at once. It's like sculpting – a little patience goes a long way.
When to Call the Professionals
Sometimes, it's best to pass the baton. When the project is too big, like preparing a large plot for construction, or if the terrain is tricky (think steep slopes), call in the pros. They bring in heavy equipment and expertise that's beyond the average DIY scope. So, how do you pick the right expert? Look for experience, and good reviews, and ask for a detailed plan and quote. It's like choosing a pilot for your flight; you want skill and reliability. Remember, the goal is getting it right, not just getting it done.
Embrace the Grade: Your Path to Land Perfection
Finally, in our journey, let’s go back to basics on ‘How do you grade land properly.’ This article covered the differences between grading and excavations, the steps for successful grading, and knowing when to contact a professional. With either of these perspectives, be it with a simple do-it-yourself project or a more complex task requiring professional skills, these observations constitute your arsenal of success. Put these tips into practice, steer clear of common pitfalls and just call on us if you have bigger or more complex projects to do with Shilling Excavation. Are you ready to level your land for grading? Turning that grade into a bedrock for achievement.